Helpforsure

Microsoft Windows Experts

Windows Performance Monitoring Concepts | Perfmon January 26, 2011


In analyzing the performance of a particular computer system with a given workload, we need to measure the following:

  • The capacity of those machines to perform this work
  • The rate at which the machines are currently performing it
  • The time it takes to complete specific tasks

Most computer performance problems can be analyzed in terms of resources, queues, service requests, and response time. This section defines these basic performance measurement concepts. It describes what they mean and how they are related. Two of the key measures of computer capacity are bandwidth and throughput. Bandwidth is a measure of capacity, which is the rate at which work can be completed, where as throughput measures the actual rate at which work requests are completed.

  • How busy the various resources of a computer system get is known as their utilization.
  • How much work each resource can process at its maximum level of utilization is defined as its capacity.
    (more…)
 

Three ways to configure WinRM listeners.


Configure WinRM Listeners through Quick Configure.

1.      Configuration HTTP listener and other actions to enable this machine for remote management:

winrm qc

2.      Configuration HTTPS listener and other actions to enable this machine for remote management:

winrm qc –transport:https (more…)


Retrieve Terminal Services Licensing Grace Period Days info via WMI January 25, 2011


Script to retrieve the number of days left in your TS Licensing Grace Period:
strComputer = “.”
Set objWMIService = GetObject(“winmgmts:\\” & strComputer & “\root\CIMV2\TerminalServices”)
‘ Obtain an instance of the the class
‘ using a key property value. (more…)


Set Relative Weight in a Terminal Services Session Directory/Broker based Farm via WMI


Script to set a Relative weight value of 100 in a Terminal Services Session Directory/Broker based Farm via a Script:

=========================

Set Relative Weight to a TS Farm

=========================
strComputer = “.”
Set objWMIService = GetObject(“winmgmts:\\” & strComputer & “\root\CIMV2\TerminalServices”)
‘ Obtain an instance of the the class
‘ using a key property value.
Set objShare = objWMIService.Get(“Win32_TSSessionDirectory”) (more…)


Howto: Backup Application/System Event logs via WMI Queries

Filed under: Scripts — helpforsure @ 5:38 am
Tags: , , , , , , , , ,

The following Visual Basic scripts(WMI) will allow you to take a backup of your Event Viewer .evtx log files by running WMI Queries:

=================================

Backup Application Event Log

=================================

strComputer = “.”
Set objWMIService = GetObject(“winmgmts:\\” & strComputer & “\root\CIMV2”)
‘ Obtain an instance of the the class
‘ using a key property value.
Set objShare = objWMIService.Get(“Win32_NTEventlogFile.Name=’C:\Windows\System32\Winevt\Logs\Application.evtx'”) (more…)


VMMTrace: Simplified SCVMM Tracing

Filed under: SCVMM — helpforsure @ 5:07 am
Tags: , , , , ,

When SCVMM is not ‘cooperating’ and no amount of digging through event logs, support articles, and forums is helping… it’s time for a trace. (What happened to SCTrace?!? See bottom of this post.)

Don’t think of tracing as a first step. Think of it instead as a solid backup plan. When you’ve made it through these items and still are no closer to resolution you are ready for ‘the trace.’


Introduction to the new Sysinternals tool: RAMMap January 23, 2011


RamMap is available from SysInternals at http://technet.microsoft.com/en-us/sysinternals/ff700229.aspx. It allows us to examine detailed memory usage information in a way that is easy accessible.

Each tab has its own wealth of data, but I’ll be focusing on Use Counts and File Summary tab as they offer the information I think most people will be interested in.

Use Counts (more…)


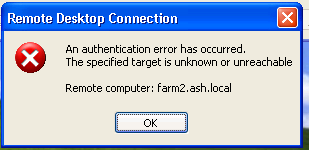
An authentication error has occurred. The specified target is unknown or unreachable. NLA Error, XP SP3

Filed under: Remote Desktop Services — helpforsure @ 11:19 pm
Tags: , , , , ,

This is really annoying and it took me a little while to find the fix, so I am blogging about this in hopes that others waste less time!

I have a 2008 R2 RD Session Host server farm. IT is set to accept only connections from NLA clients. Connecting from any Win7 machine works great.

Then I tried to connect via a client running XP SP3, running RDC 6.1 (supports NLA) with CredSSP enabled.  I got the following error: An authentication error has occurred. The specified target is unknown or unreachable.


If I turn off requiring NLA on the farm servers, I can connect.

Next, I added RDC 7.0 and tried again. I get the same error.

I tried from more XP clients, with the same setup and I get some that get in and some that give the error.  VERY CONFUSING.

Turns out,  there is a hotfix out there that fixes this:

I added: http://support.microsoft.com/kb/953760, and rebooted.

Now it works.

What I find interesting is that the hotfix does not specifically lay out this exact error result.ARGH.If it had I would have found it SO much faster.

Note: WebSSO will still not work unless you have RDC 7.0 on your XP client – RDC 7.0 is a requirement for WebSSO.


How to Install Windows Performance Analyzer (WPA)


Installation Overview

Windows Performance Analyzer (WPA) is distributed as part of the Windows Performance Toolkit (WPT). WPT is installed as part of the entire SDK installation in the following versions of the SDK:

  • Microsoft Windows SDK for Windows 7 and .NET Framework 3.5 Service Pack 1
  • Microsoft Windows SDK for Windows Server 2008 and .NET Framework 3.5

Starting with the Microsoft Windows SDK for Windows 7 and .NET Framework 4, WPT can also be installed without requiring a full SDK installation. To install only WPT, follow these steps:

  1. From the Windows Performance Analysis Developers Center, download the Windows SDK for Windows 7 and .NET Framework 4 (or a later version of the SDK).
  1. When the Windows SDK Wizard starts, click Next until you reach the Installation Options page.
  1. On the Installation Options page, clear all options and then select Windows Performance Toolkit from the Common Utilities option.
  2. Click Next to continue with the installation of the selected SDK components.

For more information about how to acquire WPT, see Windows Performance Analysis Developers Center.

WPA Installation Files

The following installation files are in an .msi format:

Xperf_x86.msi

Contains the WPA binary files for x86-based systems.

Xperf_x64.msi

Contains the WPA binary files for x64-based systems.

Xperf_ia64.msi

Contains the WPA binary files for Itanium-based systems.

These installation files are located in the bin subdirectory of the SDK when WPT is installed from the followings versions of the SDK:

  • Windows SDK for Windows 7 and .NET Framework 3.5 Service Pack 1
  • Windows SDK for Windows Server 2008 and .NET Framework 3.5

Starting with the Windows SDK for Windows 7 and .NET Framework 4, these installation files are located in the Redist\Windows Performance Toolkit subdirectory of the SDK.

WPA Installation Instructions

The installation can be performed by double clicking the appropriate .msi file or manually running the installation file. For information on running the file manually, see the online MSDN documentation.

By default WPA installs in the \Program Files\Microsoft Windows Performance Analyzer directory. This path is automatically added to the system PATH variable. If you choose to install WPA in a folder other than the default folder, the system PATH variable must include your WPA executable directory.

WPA Installation on Windows XP SP2 and Windows Server 2003 SP1

WPA can be installed and used on Windows XP SP2 and Windows Server 2003 SP1 to gather trace information. Note that the stackwalk function is not available in these environments, because in Windows XP SP2 and Windows Server 2003 SP1 the required event gathering capabilities are not available. Furthermore, all operations that require trace decoding must be done on Vista or Windows Server 2008. This includes viewing traces in the Windows Performance Analyzer tool (Xperfview.exe).

In order to capture trace information on Windows XP SP2 or Windows Server 2003 SP1 take the following steps:

  1. From the Windows Performance Analyzer directory on a Windows Vista or Windows Server 2008 machine, copy Xperf.exe and Perfctrl.dll to a directory that is in the PATH environment variable of the Windows XP SP2 or Windows Server 2003 target system.
  1. On the Windows XP SP2 or Windows Server 2003 target system, run the trace using standard WPA syntax.
  1. Copy the “etl” files to a Windows Vista or Windows Server 2008 system that has a full installation of WPA.


Enabling Stack Walking on x64 Systems

Stackwalking on x64 systems requires the DisablePagingExecutive registry value to be set in HKLM\SYSTEM\CurrentControlSet\Control\Session Manager\Memory Management. For more information, see DisablePagingExecutive .

The following examples show how to set this value by using command scripts:

  • QueryStackwalk64.cmd:
    ——8<——
    @REG QUERY “HKLM\System\CurrentControlSet\Control\Session Manager\Memory Management” -v DisablePagingExecutive
    ——8<——
  • TurnOnStackwalk64.cmd:
    ——8<——
    @REG ADD “HKLM\System\CurrentControlSet\Control\Session Manager\Memory Management” -v DisablePagingExecutive -d 0x1 -t REG_DWORD -f
    @IF NOT %ERRORLEVEL% == 0 echo error: Could not configure system for 64-bit stackwalking.  Please run this script from an elevated administrator console.
    ——8<——
    Note  To make these changes effective, you must restart the system.
  • TurnOffStackwalk64.cmd:
    ——8<——
    @REG ADD “HKLM\System\CurrentControlSet\Control\Session Manager\Memory Management” -v DisablePagingExecutive -d 0x0 -t REG_DWORD -f
    @IF NOT %ERRORLEVEL% == 0 echo error: Could not remove 64-bit stackwalking configuration.  Please run this script from an elevated administrator console.
    ——8<——
    Note  To make these changes effective, you must restart the system.
 

HowTo: Create Self-Signed Certificate via SelfSSL utility [Included in IIS 6 Reskit Tools]‏


Download the IIS 6 Resource Kit and use a tool called SelfSSL.exe. Using this tool, you can create a self signed certificate, whose  is exportable, and whose common name can be anything we want. For example, to create a self signed certificate for the RDS farm called farm1.ash.local, you would run this command (make sure to start your command console with elevated privileges!):

C:\Program Files (x86)\IIS Resources\SelfSSL>selfssl /N:cn=farm1.ash.local /K:2048

Microsoft (R) SelfSSL Version 1.0

Copyright (C) 2003 Microsoft Corporation. All rights reserved.


Do you want to replace the SSL settings for site 1 (Y/N)?y

The self signed certificate was successfully assigned to site 1.


Then when you look in the computer certificates store, you will find the certificate under the personal store:

Note: You can run SelfSSL on a Windows 7 machine.

The private key is exportable, as shown by the little key located in the upper left hand corner of the certificate icon. This means you can move it to another server.

Next you need to export the certificate so you can import it to all of your RD Session Host servers in the farm:

1. Right click on the certificate and choose All Tasks —> Export….

2. As you run through the Export Certificate Wizard, make sure to choose to export the private key.

3. Enter a password for the file for security, and save the resulting .PFX file.

Now you need to import the self signed certificate to your RD Session Host server farm members.  On each member:

1. open the computer certificates MMC, right click on the Personal store/Certificates folder, and choose: All tasks —> Import…

2. This starts the Import Certificate Wizard.

3. browse to the PFX file you created earlier.

4. Make sure the file extension dropdown box is set to All Files, and then choose your file and click Open.

5. Enter the password

6. install the certificate to the personal store (it is chosen by default)

7. Click Finish.

Now you have a self signed certificate that contains the farm name on all of your farm members, so you can test farm access now without getting a message that the machine you specified in RDC was not the name of the responding server.

Now, you also have to install the self signed cert into the Trusted Root Certification Authorities / Certificates folder in the Computer Certificate Store, on every computer you will connect to the farm with. If you don’t you will get this error:

In a real life situation, you would purchase an SSL certificate from a public CA that is part of the Microsoft Root Certificate Program (http://technet.microsoft.com/en-us/library/cc751157.aspx) so the CA certificate used to sign the SSL certificate would automatically be downloaded to the computer Trusted Root folder via Windows Updates.

But in a test situation, you have to do this part for yourself, since your self signed certificate is not part of this program.